+6
CorvairGeek
bowtie78
terry cronk
Myloth
solo79
BrokenBlazerDave
10 posters
My New Project

BrokenBlazerDave- Active Member (Tier 2)

- 5th Year AnniversaryCelebrating 5 years of being our member!
- Posts : 58
Join date : 2016-05-25
Age : 49
- Post n°1
 My New Project

solo79- *Senior Moderator*

- 10th Year Anniversary10 years of being a member on our forum!
- Posts : 458
Join date : 2013-02-06
Location : Kentucky
- Post n°2
 Re: My New Project
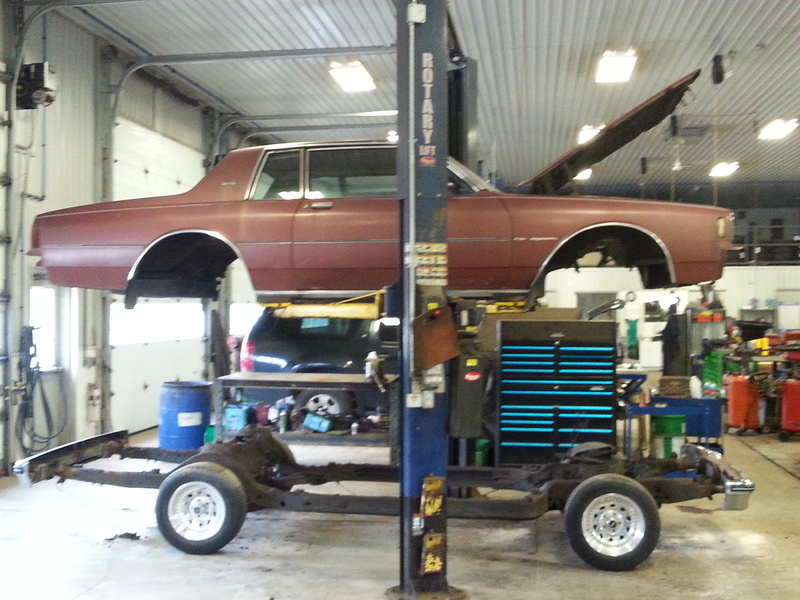
Awesome! You make it look so easy. I have got to get a lift. I'm pulling the body off my frame eventually.

BrokenBlazerDave- Active Member (Tier 2)

- 5th Year AnniversaryCelebrating 5 years of being our member!
- Posts : 58
Join date : 2016-05-25
Age : 49
- Post n°3
 Re: My New Project
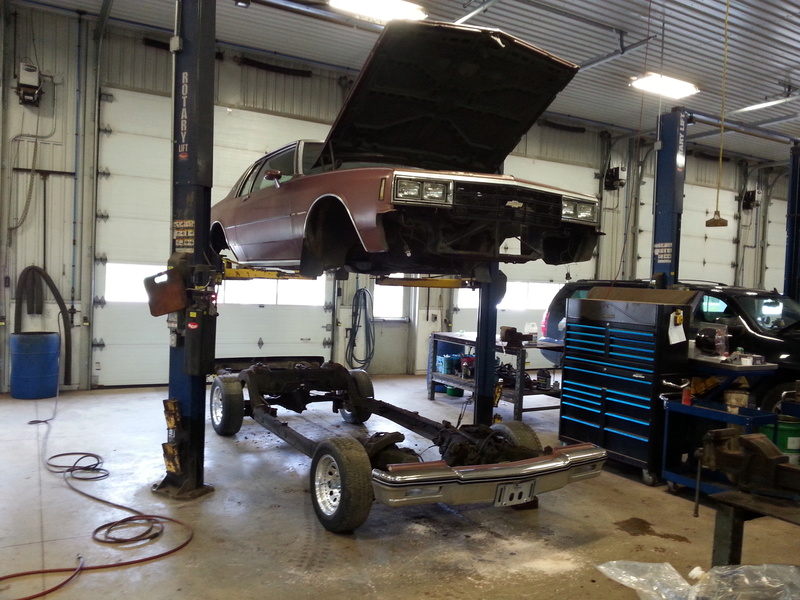
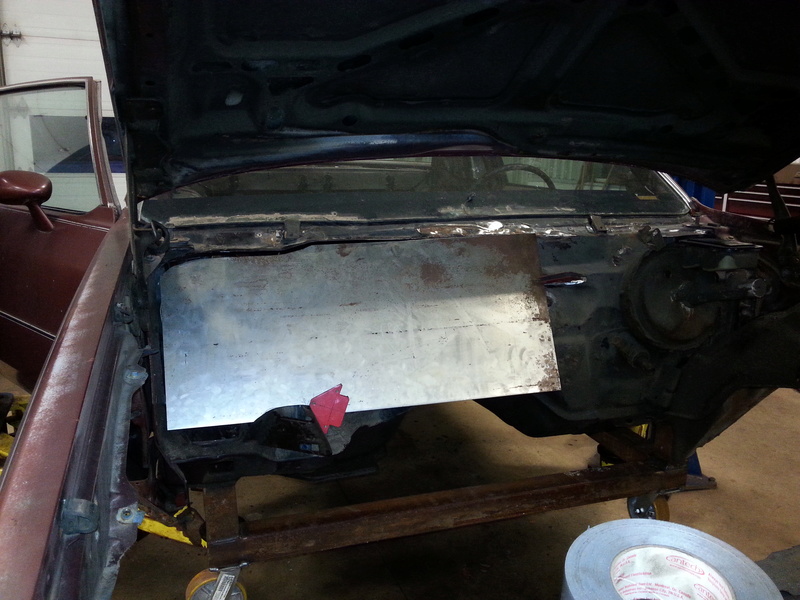
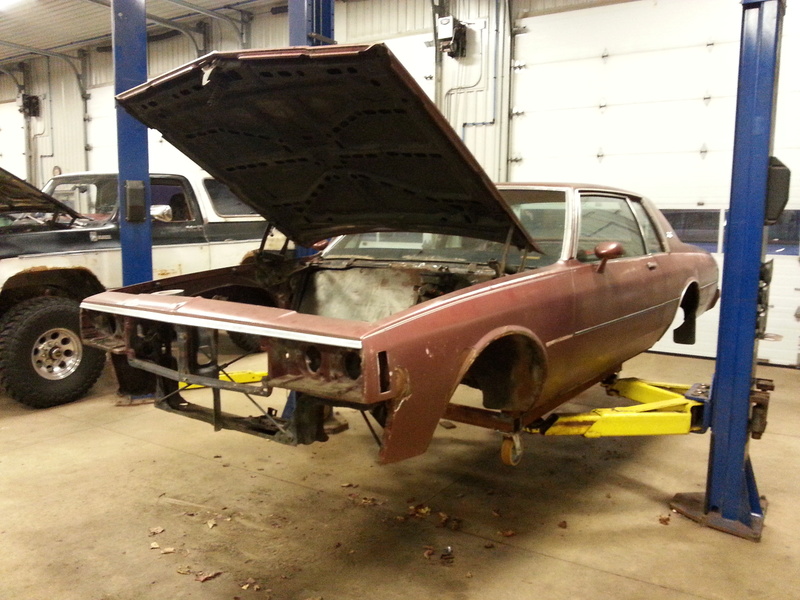
I am far too spoiled now to work with out a hoist. The guys that are not lucky enough to have a hoist do some jobs that completely amaze me. I only got a little bit done this weekend. I removed the heater case and cut out some of the rusty metal around it and removed some unnecessary bumps on the firewall. I will smooth out as much as I can. I removed the wiper motor mount and started to fill the giant hole I made.


Myloth- Moderator

- Helpful and Responsive Member!Very active with responding and helping other members with questions and concerns.10th Year Anniversary10 years of being a member on our forum!
- Posts : 638
Join date : 2014-06-09
Location : At the base of the Mountain (NY) Adirondacks
- Post n°4
 Re: My New Project
Excellent looks like you are having fun this past weekend. I know what you mean about a hoists, I'm one of those
who has done all his work on the ground with a jack and a pair of ramps .(Oi my back) It's nice to see someone
doing body off work on a B body!
who has done all his work on the ground with a jack and a pair of ramps .(Oi my back) It's nice to see someone
doing body off work on a B body!

BrokenBlazerDave- Active Member (Tier 2)

- 5th Year AnniversaryCelebrating 5 years of being our member!
- Posts : 58
Join date : 2016-05-25
Age : 49
- Post n°5
 Re: My New Project
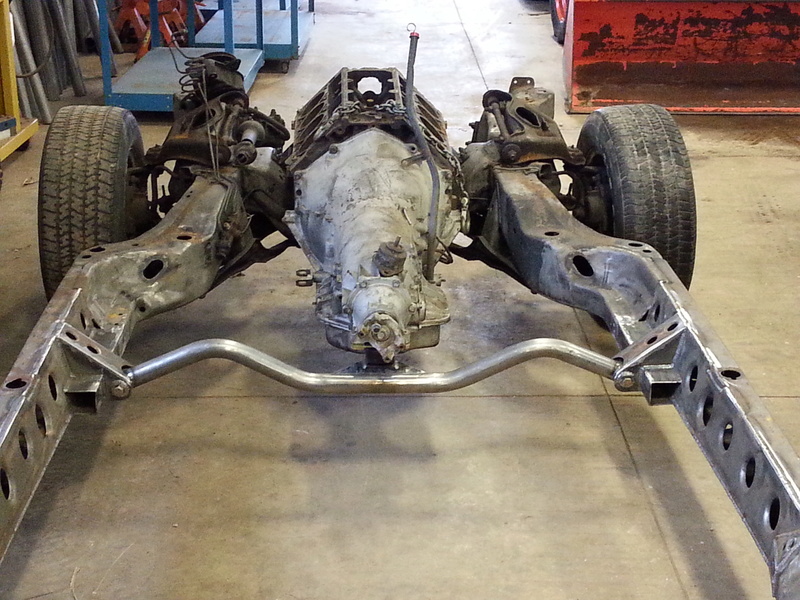
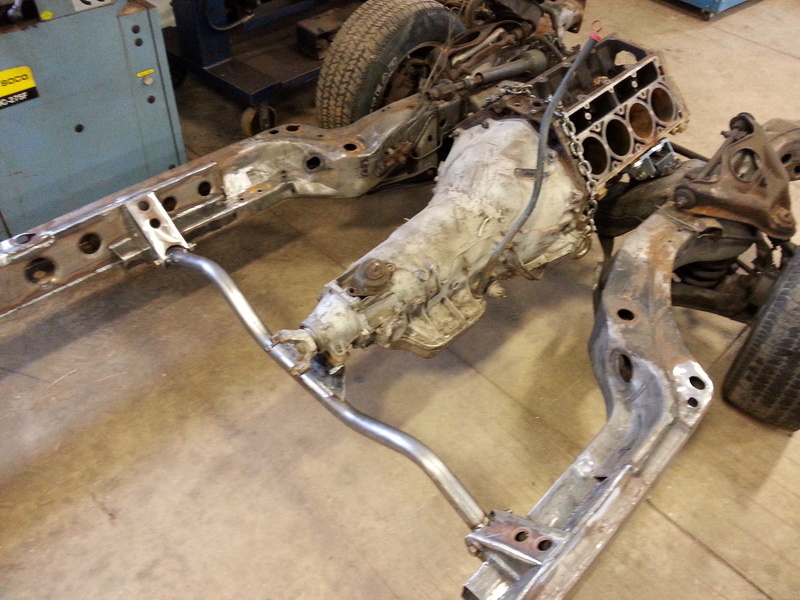
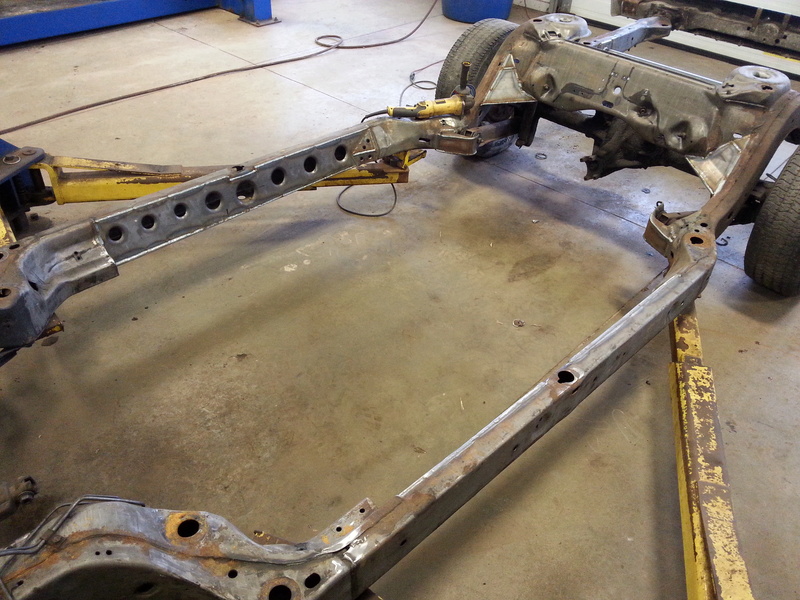
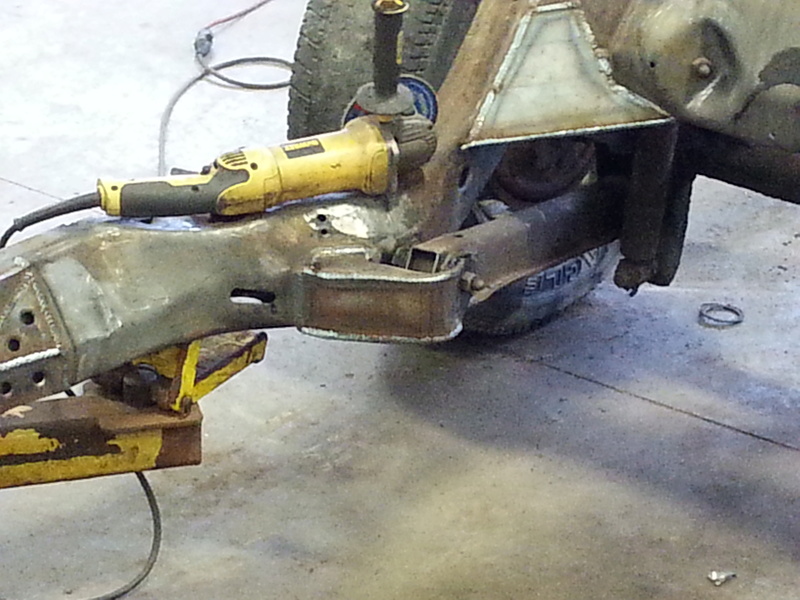
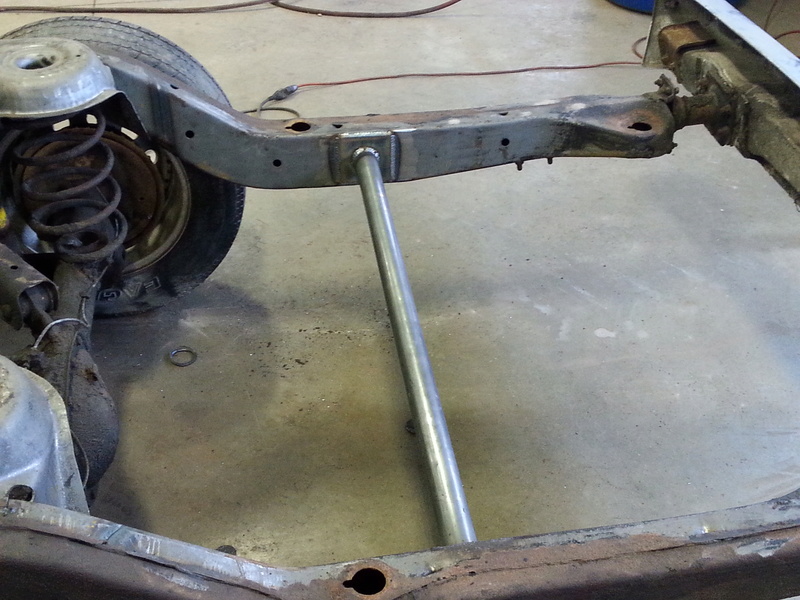
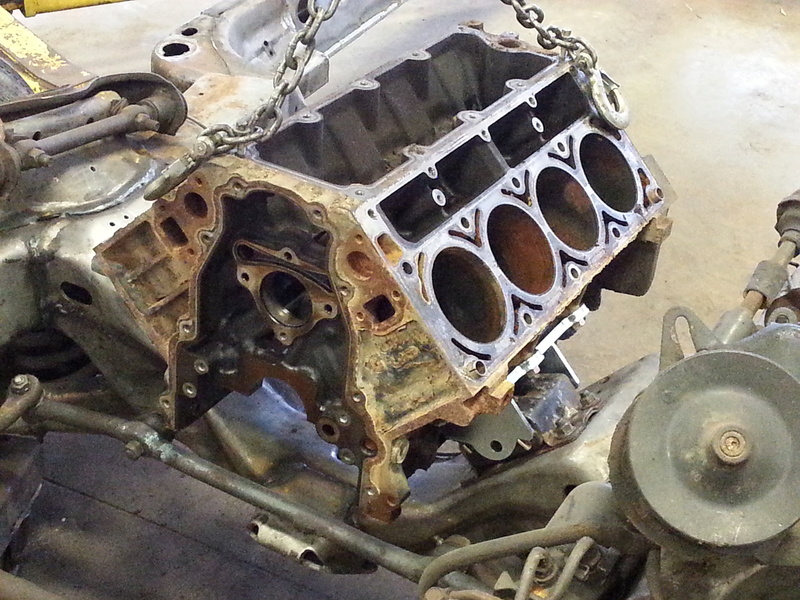
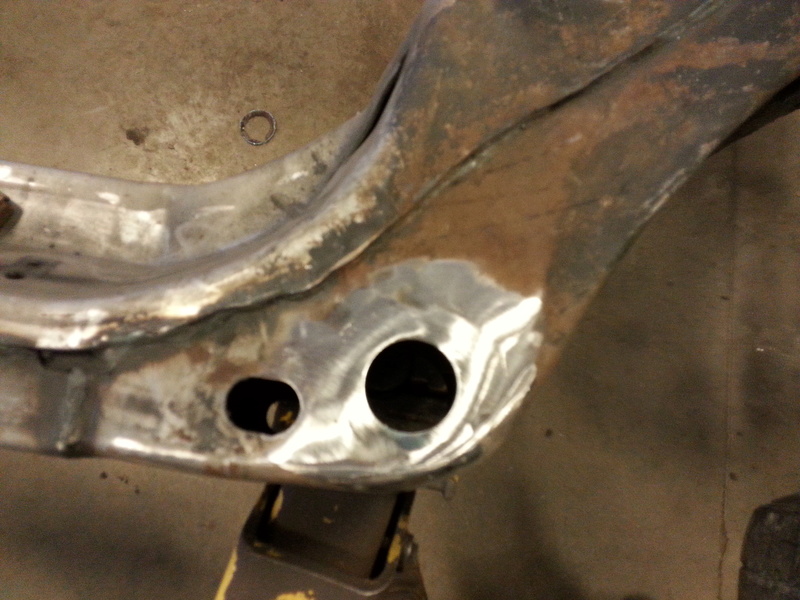
I have only got a little more work done. Been busy with snow tires. Here are some pics of the progress. I boxed the frame in the center section. I closed in the lower control arm mounts. I added a rear crossmember for some rigidity when I put it on the rotisserie. I test fit the motor mounts on my test engine. I repaired one of the body mount holes.


BrokenBlazerDave- Active Member (Tier 2)

- 5th Year AnniversaryCelebrating 5 years of being our member!
- Posts : 58
Join date : 2016-05-25
Age : 49
- Post n°6
 Re: My New Project
terry cronk- Freshman Member (Tier 3)

- 5th Year AnniversaryCelebrating 5 years of being our member!
- Posts : 249
Join date : 2015-08-19
Age : 77
Location : Mid-Michigan
- Post n°7
 Project
That's some nice fabricating on the suspension. That ought to stiffen that frame very well.
The boxing of the frame was a nice addition to the weak link.
Keep on keeping on!
The boxing of the frame was a nice addition to the weak link.
Keep on keeping on!

bowtie78- Active Member (Tier 2)

- 5th Year AnniversaryCelebrating 5 years of being our member!
- Posts : 12
Join date : 2016-05-06
Location : south saint paul
- Post n°8
 Re: My New Project
Did you build that trans crossmember?

BrokenBlazerDave- Active Member (Tier 2)

- 5th Year AnniversaryCelebrating 5 years of being our member!
- Posts : 58
Join date : 2016-05-25
Age : 49
- Post n°9
 Re: My New Project

bowtie78- Active Member (Tier 2)

- 5th Year AnniversaryCelebrating 5 years of being our member!
- Posts : 12
Join date : 2016-05-06
Location : south saint paul
- Post n°10
 Re: My New Project
Looks good, you should make up a few like in a lot and sell them, I know I would buy one , the box in job looks good to are you just going to run new brake and fuel lines over the top of it then?
I am doing the frame boxing now but since the brake and fuel lines are in such good shape I decided to clean them and paint them , reinstall and box over where they run in the frame ( since the car will never see bad weather and is just going to be a cruiser, I won't be boxing as much as you)
As soon as I figure out how to post some pics I will
Have a merry Christmas and keep it between the ditches!

bowtie78- Active Member (Tier 2)

- 5th Year AnniversaryCelebrating 5 years of being our member!
- Posts : 12
Join date : 2016-05-06
Location : south saint paul
- Post n°11
 Re: My New Project
And how did you make the holes in the welded in sections on the side of frame? Press?

BrokenBlazerDave- Active Member (Tier 2)

- 5th Year AnniversaryCelebrating 5 years of being our member!
- Posts : 58
Join date : 2016-05-25
Age : 49
- Post n°12
 Re: My New Project
The only problem with making more cross members is the mods I have made to my frame. On the right side frame rail I cut out the section that the factory cross member bolts to. I did this so the pieces I used to box the frame were the same length. Then I added the small 2 X 2.5 boxed section to match up the existing frame design. I don't think this will clear a factory floor either. I plan on changing the floor anyway. I would prefer to make cross members on a case by case basis. Basically make it fit what you have not what I think you should have.
I plan on making any new brake lines it needs. It will be rear disc so the lines will be a little different on the rear axle also. On the frame I will likely use rubber "P" clamps for the brake lines and the upgraded fuel lines. I will just run them over top of my boxed in section. I might cut a hole in the transmission bracing and put a piece of tube through it so the lines can pass through. I will post pictures as I make progress.
The holes are contoured with dimple dies I got from TMR Customs. I made the holes that are larger than one inch with a hole saw. The holes smaller than an inch I used my ironworker. Once I had the holes made I used a press to form them.
Thanks for the interest.

terry cronk- Freshman Member (Tier 3)

- 5th Year AnniversaryCelebrating 5 years of being our member!
- Posts : 249
Join date : 2015-08-19
Age : 77
Location : Mid-Michigan
- Post n°13
 Brake lines
If your looking for new brake lines of either steel or stainless steel they have them.
Even rearend brake lines for drum or disc.. If your using your original diff. its easy.
Also transmission lines and fuel lines. All premade with OEM specs..
They have an array of a catalog. Check them out.
www.inlinetube.com
Even rearend brake lines for drum or disc.. If your using your original diff. its easy.
Also transmission lines and fuel lines. All premade with OEM specs..
They have an array of a catalog. Check them out.
www.inlinetube.com

bowtie78- Active Member (Tier 2)

- 5th Year AnniversaryCelebrating 5 years of being our member!
- Posts : 12
Join date : 2016-05-06
Location : south saint paul
- Post n°14
 Re: My New Project
I have all good oem lines will need a different proportioning valve as I have built a 3.73 posi 8.5 rear ( donor 96 impala ss) and am going to run the disc brakes and will have to source an adjustable unit. Going to hang the rear in the frame today since the new control arms and sway bar showed up last night

BrokenBlazerDave- Active Member (Tier 2)

- 5th Year AnniversaryCelebrating 5 years of being our member!
- Posts : 58
Join date : 2016-05-25
Age : 49
- Post n°15
 Re: My New Project
I make all of my own lines because we are so used to doing it on every vehicle. I have already replaced brake lines on 2011 vehicles.
In the past I have used a proportioning valve off a 1981 Trans Am. It came with factory rear disc. Lately I have ordered a new valve from a place called John Stewart Power Brakes. The valve bolt right in place of the factory valve. It uses the same brake line fittings and everything.
In the past I have used a proportioning valve off a 1981 Trans Am. It came with factory rear disc. Lately I have ordered a new valve from a place called John Stewart Power Brakes. The valve bolt right in place of the factory valve. It uses the same brake line fittings and everything.

CorvairGeek- Active Member (Tier 2)

- 5th Year AnniversaryCelebrating 5 years of being our member!
- Posts : 10
Join date : 2015-04-05
Age : 60
Location : The Gem State
- Post n°16
 Re: My New Project
That is now a very nice looking frame. Love your work

BrokenBlazerDave- Active Member (Tier 2)

- 5th Year AnniversaryCelebrating 5 years of being our member!
- Posts : 58
Join date : 2016-05-25
Age : 49
- Post n°17
 Re: My New Project
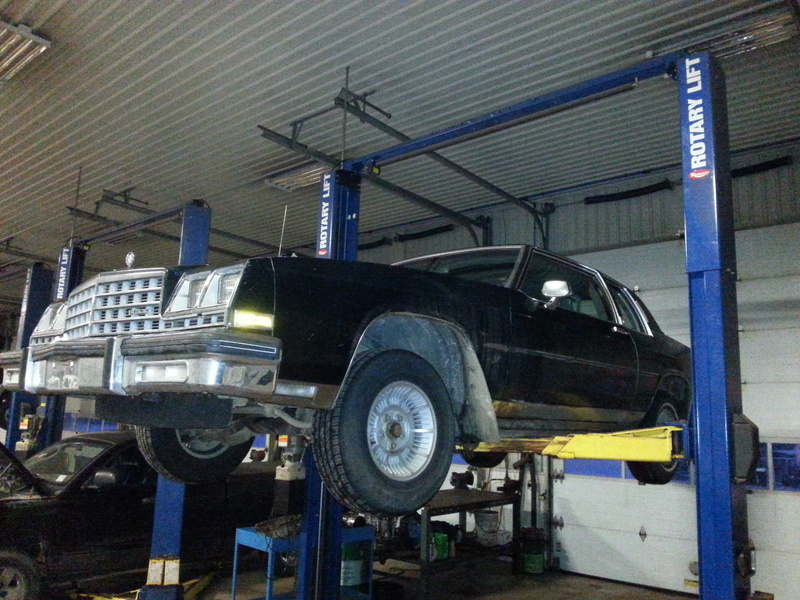
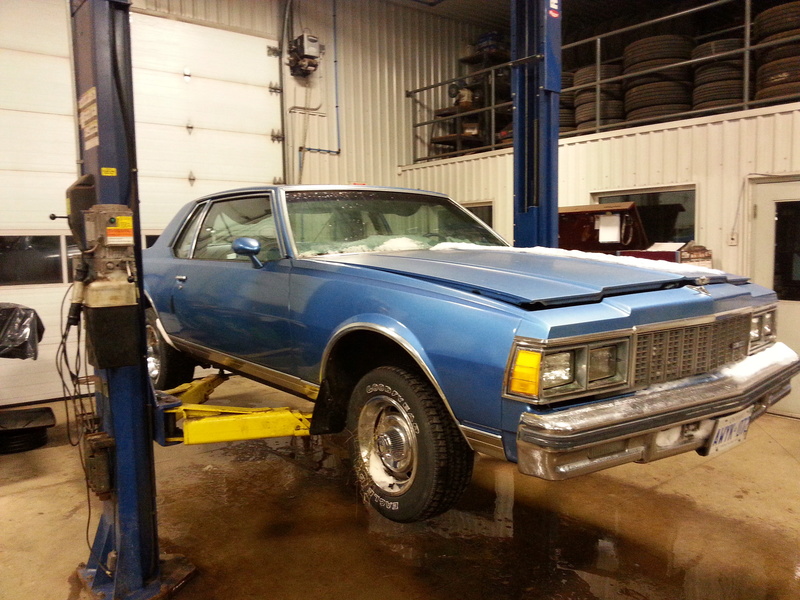

I have not made any progress on the 1981 Impala because I went and bought 2 more B bodies. One is a 1981 Buick LeSabre and the other is a 1979 Chevrolet Impala. I got the 1981 Buick LeSabre first because it is really solid. It is getting a 6.0L/4L60E set up. It had a 2.41:1 axle ratio in it but because I am putting in a OD transmission I want to have a good gear ratio in it. The only problem is the Buick came with a 8.75" BOP rear axle witch has very limited ratio choices. So I took the 8.5" BOP rear axle out of the Impala and put it in the Buick. It is getting an Auburn posi and 3.42:1 gears. This created a hole new set of problems. I wanted to use the big brakes on the Buick but the bolt pattern is different. So I put Camaro front rotors on that were the same diameter and the 5 on 4.75 bolt pattern. The rear is getting S10 caliper brackets and disc brakes. It is too bad the Impala was parked on grass for 5 years. It rotted out the frame and floors and became a hotel for mice. The mice were every where in the car. I am really bummed about the condition of the Impala because it is such a better looking car.

hotwheelsboy28- Active Member (Tier 2)

- 10th Year Anniversary10 years of being a member on our forum!
- Posts : 24
Join date : 2014-01-11
Location : Tennessee
- Post n°18
 Cool Projects
Very nice work man, I'm diggin it. I really like the Lesabre idea, mine is a 80' model and was my first car it now has a 455/400 Olds combo in it all rebuilt. It's been a slow process but I'll get there one day. I have pics of it on this site.

GM B-Body Forum- Admin

- Helpful and Responsive Member!Very active with responding and helping other members with questions and concerns.10th Year Anniversary10 years of being a member on our forum!
- Posts : 756
Join date : 2013-01-14
Age : 32
Location : Flint/Detroit, MI - Charlotte, NC
- Post n°19
 Re: My New Project
Can I just buy your frame and swap you mine! hahaha i love the fab and strength your adding i need that on mine. That frame looks beautiful, im surprised i didnt see this thread til now! But great job!

efladerr- Active Member (Tier 2)

- 5th Year AnniversaryCelebrating 5 years of being our member!
- Posts : 35
Join date : 2016-02-29
Age : 27
Location : Kuwait
- Post n°20
 Re: My New Project
Nice work on the frame dude. one question though how did you learn to fabrication ?. I don't know anything about fabrication and welding but I really need to learn.

terry cronk- Freshman Member (Tier 3)

- 5th Year AnniversaryCelebrating 5 years of being our member!
- Posts : 249
Join date : 2015-08-19
Age : 77
Location : Mid-Michigan
- Post n°21
 New project
In the later picture you have welded in a tubular support for rigidity.
Is that just ahead or behind the fuel tank?
Or are you going w/fuel cell in the trunk area?
Is that an LS block? Looks like the adapter plates from a Gen. 1 engine position.
So I guess using solid mounts are a "GO"!
Beautiful frame/welding job by the way.
Is that just ahead or behind the fuel tank?
Or are you going w/fuel cell in the trunk area?
Is that an LS block? Looks like the adapter plates from a Gen. 1 engine position.
So I guess using solid mounts are a "GO"!
Beautiful frame/welding job by the way.

GM B-Body Forum- Admin

- Helpful and Responsive Member!Very active with responding and helping other members with questions and concerns.10th Year Anniversary10 years of being a member on our forum!
- Posts : 756
Join date : 2013-01-14
Age : 32
Location : Flint/Detroit, MI - Charlotte, NC
- Post n°22
 Re: My New Project
Just from looking at it i can tell you its almost in the middle of the fuel tank, he must be going with a fuel cell.

BrokenBlazerDave- Active Member (Tier 2)

- 5th Year AnniversaryCelebrating 5 years of being our member!
- Posts : 58
Join date : 2016-05-25
Age : 49
- Post n°23
 Re: My New Project
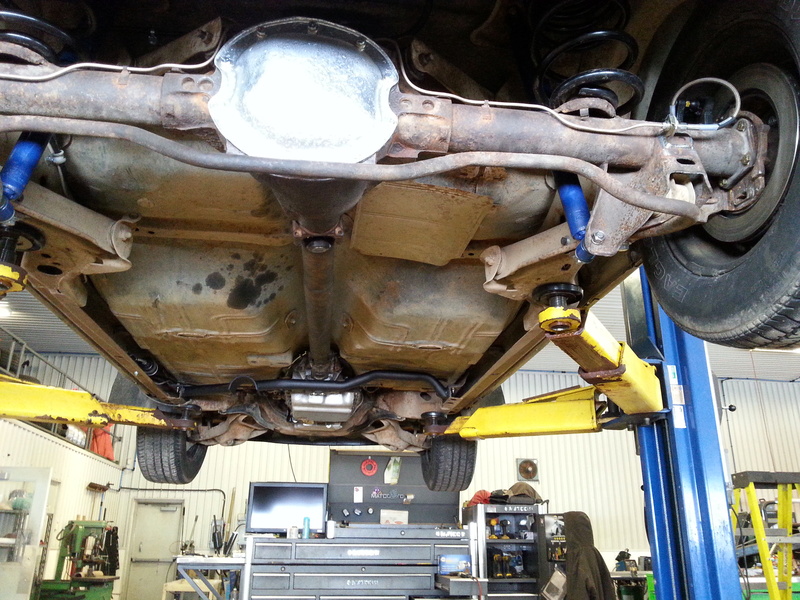
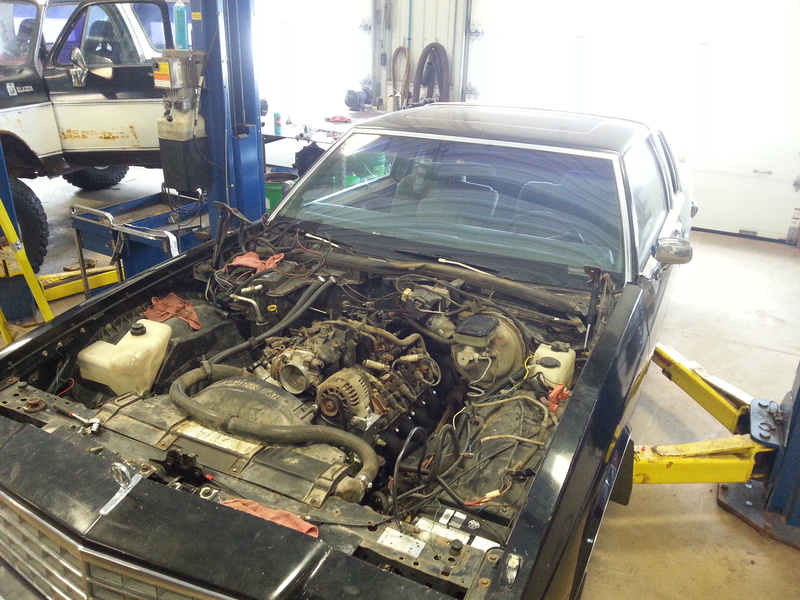
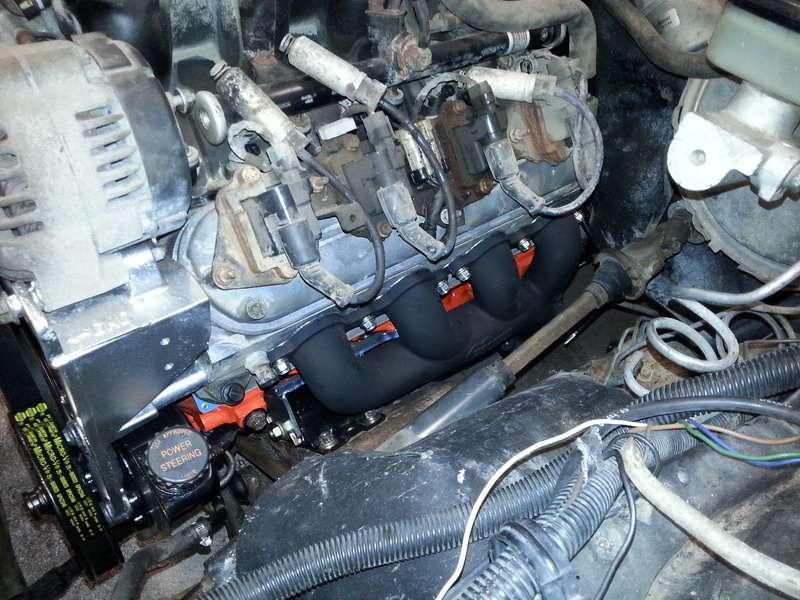
Sorry for taking so long to reply. I really wanted to add some pics but had not been making very much headway. I have a few pics now. To answer a few questions first.
I am going with a fuel cell. The red 1981 is just for drag racing. I welded in that rear bar for rigidity but still may chop the back of the frame off to fit really big tires. That is still up in the air though. It is an LS block with Holley G-body swap mounts to Energy Suspension motor mounts. I have no sentimental attachment to the red car so I am going to chop the crap out of it. I added the weight of the frame bracing because my other car is cracking the roof from the twist it has. I will have to cut a bunch of the floor out to clear the crossmember.
I will get back to the red car soon.
I want to get the Buick done first to see if it works good.


BrokenBlazerDave- Active Member (Tier 2)

- 5th Year AnniversaryCelebrating 5 years of being our member!
- Posts : 58
Join date : 2016-05-25
Age : 49
- Post n°24
 Re: My New Project
efladerr wrote:Nice work on the frame dude. one question though how did you learn to fabrication ?. I don't know anything about fabrication and welding but I really need to learn.
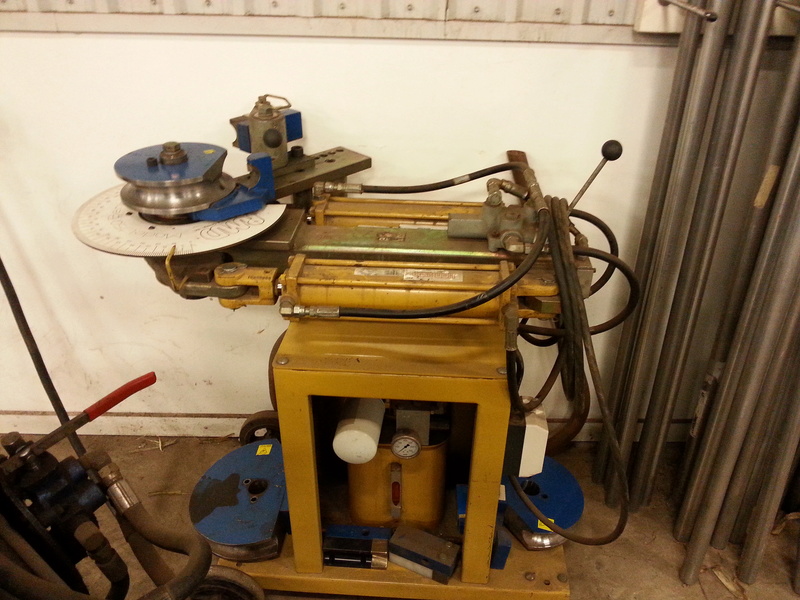
I have been lucky to be around cars my whole life and always had access to welders, pipe benders, and machine shop equipment. So fabrication has been an ongoing learning experience and I want to learn a lot more.

BrokenBlazerDave- Active Member (Tier 2)

- 5th Year AnniversaryCelebrating 5 years of being our member!
- Posts : 58
Join date : 2016-05-25
Age : 49
- Post n°25
 Re: My New Project
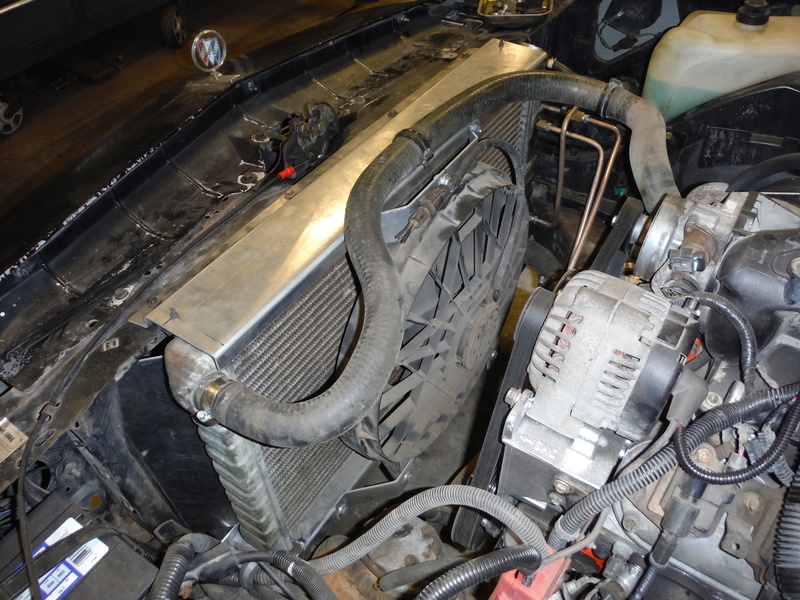
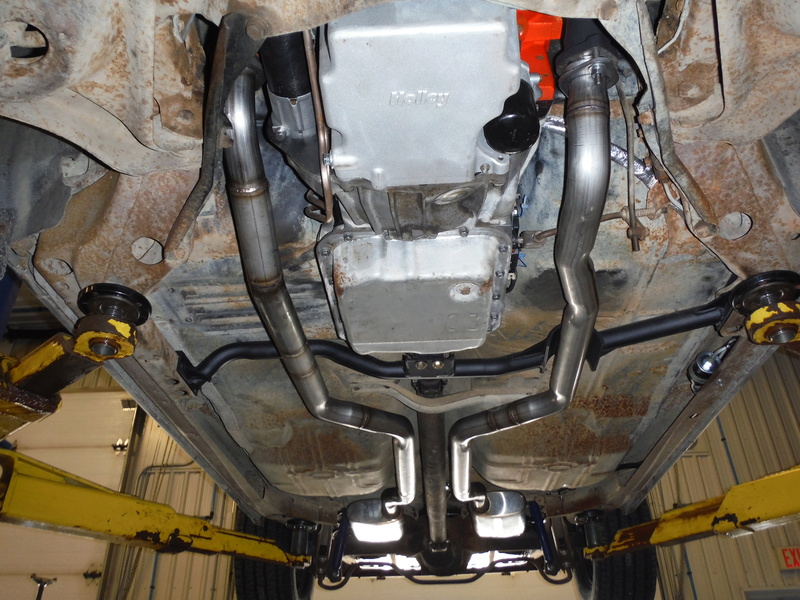
Had to remove the fan shroud and fan to have enough room to get an air intake into place. This is a Crown Victoria fan I think. It is what the local auto wrecker had sitting on top of the pile of electric fans. I put some exhaust on yesterday also.
I got the gauges installed but still have some work to do on the interior.
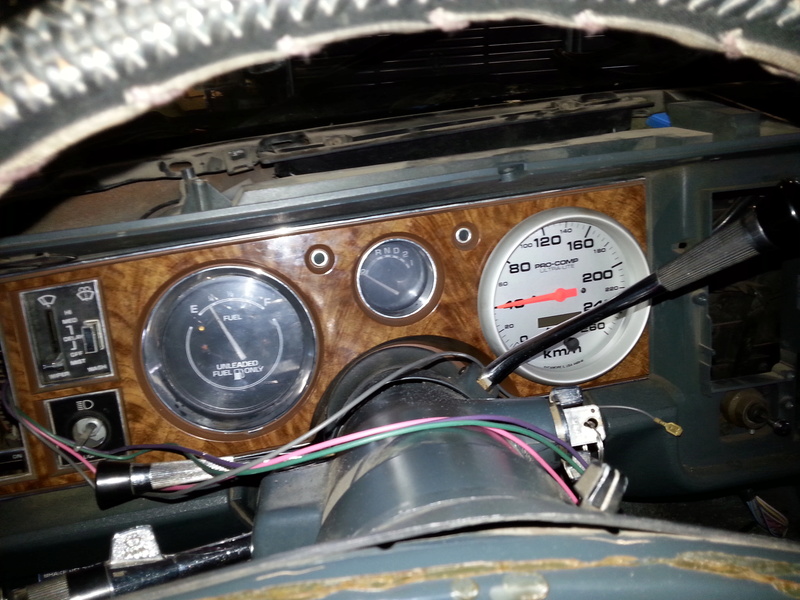


I got the gauges installed but still have some work to do on the interior.


