+2
HeavyChevy77
GM B-Body Forum
6 posters
6-Way Power Seat Disassembly
GM B-Body Forum- Admin
- Helpful and Responsive Member!Very active with responding and helping other members with questions and concerns.10th Year Anniversary10 years of being a member on our forum!
- Posts : 756
Join date : 2013-01-14
Age : 32
Location : Flint/Detroit, MI - Charlotte, NC
- Post n°1
6-Way Power Seat Disassembly
Tackled another project today, and that was fixing the driver power seat. Some bolts had fallen out jamming up the sliders. Took it all apart, cleaned it up and it works great now, finally all 6 ways work! And of course a few photos:
HeavyChevy77- Freshman Member (Tier 3)
- 10th Year Anniversary10 years of being a member on our forum!
- Posts : 243
Join date : 2013-07-03
Age : 31
Location : San Diego, Ca
- Post n°2
Re: 6-Way Power Seat Disassembly
Is it possible to remove the front 6 way power seat motor frame and bolt to (2) front bucket seats.
GM B-Body Forum- Admin
- Helpful and Responsive Member!Very active with responding and helping other members with questions and concerns.10th Year Anniversary10 years of being a member on our forum!
- Posts : 756
Join date : 2013-01-14
Age : 32
Location : Flint/Detroit, MI - Charlotte, NC
- Post n°3
Re: 6-Way Power Seat Disassembly
Oh yes it is very possible. The only problem i see is where the brackets bolt to the seat, im sure they may be in different locations on different seats depending on what you put it. But its definitely possible.
HeavyChevy77- Freshman Member (Tier 3)
- 10th Year Anniversary10 years of being a member on our forum!
- Posts : 243
Join date : 2013-07-03
Age : 31
Location : San Diego, Ca
- Post n°4
Re: 6-Way Power Seat Disassembly
Yea cuz the buckets have 4 corners holes
And the bench on the sides but is the seat motor/frame intergrated in the back rest or just bolt on the bottom
Thanks
And the bench on the sides but is the seat motor/frame intergrated in the back rest or just bolt on the bottom
Thanks
GM B-Body Forum- Admin
- Helpful and Responsive Member!Very active with responding and helping other members with questions and concerns.10th Year Anniversary10 years of being a member on our forum!
- Posts : 756
Join date : 2013-01-14
Age : 32
Location : Flint/Detroit, MI - Charlotte, NC
- Post n°5
Re: 6-Way Power Seat Disassembly
Oh so you got a bench in the front?
HeavyChevy77- Freshman Member (Tier 3)
- 10th Year Anniversary10 years of being a member on our forum!
- Posts : 243
Join date : 2013-07-03
Age : 31
Location : San Diego, Ca
- Post n°6
Re: 6-Way Power Seat Disassembly
Yea I tryin it that way or pray for some seat rail to show on the junk yard but that's rare
GM B-Body Forum- Admin
- Helpful and Responsive Member!Very active with responding and helping other members with questions and concerns.10th Year Anniversary10 years of being a member on our forum!
- Posts : 756
Join date : 2013-01-14
Age : 32
Location : Flint/Detroit, MI - Charlotte, NC
- Post n°7
Re: 6-Way Power Seat Disassembly
Yeah i know they aint gonna show up at the junkyard. I know since you have a bench in the front, you only have the two mounts to the floor boards so youll have to find a 77-96 donor car to get the other mounts to make it work which is gonna be alot of fun.
Sweet Seventy9- *Senior Moderator*
- Helpful and Responsive Member!Very active with responding and helping other members with questions and concerns.10th Year Anniversary10 years of being a member on our forum!
- Posts : 973
Join date : 2013-11-03
Location : Upstate NY
- Post n°8
Re: 6-Way Power Seat Disassembly
Hmmmm, has anyone ever tried putting one power unit on each side of the bench seat so the whole seat adjusts?
I've never heard of it but it might work. What a way to set your car apart from all the rest!
HeavyChevy77- Freshman Member (Tier 3)
- 10th Year Anniversary10 years of being a member on our forum!
- Posts : 243
Join date : 2013-07-03
Age : 31
Location : San Diego, Ca
- Post n°9
Re: 6-Way Power Seat Disassembly
How many/ where are the bolts that hold the powered mechanism to the seat
The seats I have are from a 77-79 caprice as we'll
Instead of changing brackets I was thinking of mounting the mechanism on the outer sides like before but join the two buckets at the middle by using flat thick metal stock with a slight upside u bump/notch in the center to clear the transmission tunnel and the outer ends of the stock bolted to the bottoms of the buckets.. Let me kno what you guys think or and alternative suggestions.
Myloth- Moderator
- Helpful and Responsive Member!Very active with responding and helping other members with questions and concerns.10th Year Anniversary10 years of being a member on our forum!
- Posts : 638
Join date : 2014-06-09
Location : At the base of the Mountain (NY) Adirondacks
- Post n°10
Re: 6-Way Power Seat Disassembly
If you can find some Bonny seats those are nice . And I used to drive a 05' Impala and those seats were bucket cloth
(bleh) even my brother-in-law's SS (04')leathers are so-so. I can't say they are terrible just average GM, the Bonneville
buckets or even the Park Avenue Benches I had a 96 PA Ultra oh those seats were nice a tad cushy but nice.
(bleh) even my brother-in-law's SS (04')leathers are so-so. I can't say they are terrible just average GM, the Bonneville
buckets or even the Park Avenue Benches I had a 96 PA Ultra oh those seats were nice a tad cushy but nice.
solo79- *Senior Moderator*
- 10th Year Anniversary10 years of being a member on our forum!
- Posts : 458
Join date : 2013-02-06
Location : Kentucky
- Post n°11
Re: 6-Way Power Seat Disassembly
HeavyChevy77 wrote:How many/ where are the bolts that hold the powered mechanism to the seat
The seats I have are from a 77-79 caprice as we'll
Instead of changing brackets I was thinking of mounting the mechanism on the outer sides like before but join the two buckets at the middle by using flat thick metal stock with a slight upside u bump/notch in the center to clear the transmission tunnel and the outer ends of the stock bolted to the bottoms of the buckets.. Let me kno what you guys think or and alternative suggestions.
That would be an interesting and challenging way of doing it. You could also build a custom console on top of your bucket seat tie in the middle, so that the seats and console move together. The only disadvantage I see in tying the two buckets together is that you still effectively have a bench seat, only more comfortable since it would be two buckets technically.
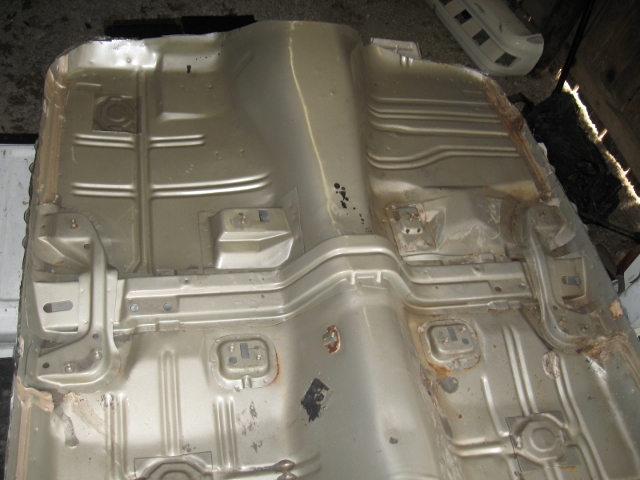
Honestly, adding the inner mounts would not be all that difficult and then you could add power tracks to both seats. You can get the inner mounts out of a ton of different cars from 77-96. Any later bubble Caprice, Roadmaster, Fleetwood, etc... that has inner mounts will work in your car. Here is a picture of what the pan looks like with inner seat mounts:
Notice all the little dimples around the flanges of the inner mounts? You can simply drill all of those out at a yard and those mounts will come right off. You can use a spot weld cutter or you can drill all the way through a little larger hole since you're not worried about saving the junk yard pan. On your car, simply remove your seats and carpet and taking your power seat tracks, you can set them in there and position the new mounts under them, line it all up and trace around the mounts on your floor pan and either you or someone can spot weld them in using the holes you drilled through them. You could also spot weld around the edge if you wanted. Grind smooth, seal and presto you have inner mounts.
Also, while you have your bare pan exposed, it's a great time to fix any rust issues you might have, scuff the entire thing with scotchbrite pads and coat it with a rubberized undercoating or you could go full on rust proof and POR-15 the whole pan which is a little more expensive, but it will never rust again.
Sweet Seventy9- *Senior Moderator*
- Helpful and Responsive Member!Very active with responding and helping other members with questions and concerns.10th Year Anniversary10 years of being a member on our forum!
- Posts : 973
Join date : 2013-11-03
Location : Upstate NY
- Post n°12
Re: 6-Way Power Seat Disassembly
Without having the inner seat mounts, a quick and easy way to mount bucket seats is to simply drill holes through the floor and use long bolts with a stack of fender washers. You'll need a bunch of washers so buy a bulk package. Home depot sells them in bags of 100 for like $10-$12. Be sure to use some silicone under the car to seal and waterproof the area after the install. Permatex Ultra Black works great and blends in with the underside of the car well.
Myloth- Moderator
- Helpful and Responsive Member!Very active with responding and helping other members with questions and concerns.10th Year Anniversary10 years of being a member on our forum!
- Posts : 638
Join date : 2014-06-09
Location : At the base of the Mountain (NY) Adirondacks
- Post n°13
Re: 6-Way Power Seat Disassembly
Sweet is absolutely right , I did that when I was 17 by installing a pair of Volkswagen buckets in a Dodge Omni GLH Turbo.
It took me a bit to figure it out(I ws 17 lol) but those seats were solid I used to drag that car on Woodhaven Blvd down in Queens
back in the late 80s. And I used bolts with big washers and rubber washers . Considering it was Volkswagen to Dodge I would
think anything is possible .
It took me a bit to figure it out(I ws 17 lol) but those seats were solid I used to drag that car on Woodhaven Blvd down in Queens
back in the late 80s. And I used bolts with big washers and rubber washers . Considering it was Volkswagen to Dodge I would
think anything is possible .
HeavyChevy77- Freshman Member (Tier 3)
- 10th Year Anniversary10 years of being a member on our forum!
- Posts : 243
Join date : 2013-07-03
Age : 31
Location : San Diego, Ca
- Post n°14
Re: 6-Way Power Seat Disassembly
The two seats are basicly a 50/50 split bench seat , both seats together are the same width as the bench seat so there's no center console.
Thanks solo79 for the tip with the mounts on the inside, just drill the spot welds out and slap it in.
So if I go his route I'll be needing the sliding rail on the insides and idk how I'll squeeze it with the electric 6 way motor under the seats
So I back to square one with the metal in the middle
Also where is the bolts that secure the motor to the seat
-----^----- kinda like this
solo79- *Senior Moderator*
- 10th Year Anniversary10 years of being a member on our forum!
- Posts : 458
Join date : 2013-02-06
Location : Kentucky
- Post n°15
Re: 6-Way Power Seat Disassembly
Sweet Seventy9 wrote:Without having the inner seat mounts, a quick and easy way to mount bucket seats is to simply drill holes through the floor and use long bolts with a stack of fender washers. You'll need a bunch of washers so buy a bulk package. Home depot sells them in bags of 100 for like $10-$12. Be sure to use some silicone under the car to seal and waterproof the area after the install. Permatex Ultra Black works great and blends in with the underside of the car well.
That will work too! I've done exactly that on the first car. However, over time, those bolts tend to wallow out the hole in the thin sheet metal and lean/shift, which causes the seat tracks to start getting in a bind. When this happened on mine, I got a piece of 3/16" steel and cut some 3" squares, drilled tight fitting holes through them for the bolt and put them on each side of the pan for the bolt to go through and that worked like a charm to strengthen it up.
HeavyChevy77- Freshman Member (Tier 3)
- 10th Year Anniversary10 years of being a member on our forum!
- Posts : 243
Join date : 2013-07-03
Age : 31
Location : San Diego, Ca
- Post n°16
Re: 6-Way Power Seat Disassembly
Yea but then it would be a fixed position and if ima have electric seats they might as well function ima just join them in the center but might make a slide rail and bolt it in the middle , so thanks for that little ideasolo79 wrote:Sweet Seventy9 wrote:Without having the inner seat mounts, a quick and easy way to mount bucket seats is to simply drill holes through the floor and use long bolts with a stack of fender washers. You'll need a bunch of washers so buy a bulk package. Home depot sells them in bags of 100 for like $10-$12. Be sure to use some silicone under the car to seal and waterproof the area after the install. Permatex Ultra Black works great and blends in with the underside of the car well.
That will work too! I've done exactly that on the first car. However, over time, those bolts tend to wallow out the hole in the thin sheet metal and lean/shift, which causes the seat tracks to start getting in a bind. When this happened on mine, I got a piece of 3/16" steel and cut some 3" squares, drilled tight fitting holes through them for the bolt and put them on each side of the pan for the bolt to go through and that worked like a charm to strengthen it up.
HeavyChevy77- Freshman Member (Tier 3)
- 10th Year Anniversary10 years of being a member on our forum!
- Posts : 243
Join date : 2013-07-03
Age : 31
Location : San Diego, Ca
- Post n°17
Re: 6-Way Power Seat Disassembly
Success!!! Today started to take the bench seat out to swap it to the two bucket seats outta another 77-79 caprice but as others said I needed the inner mounting studs but with my stubborness I found another way.
After removing the bench flipped it upside down and removed the seat rails (earlier I was asking were these bolts were at and there were 2 bolts each outer side on the front and back part on the bottom of the seat , didn't see it before because I had track all the way back so it was covered)
After I popped the seat tracks off I noticed the stock bench seat already had a support bracket that supported the center, which also supports the motor that had got me to study it in the first place, then proceeded to drill out the spot welds (solo79 suggested drilling the welds on the mounting studs/same concept different part) I had to remove the front hogties and pull the fabric back a lil to get to the spot welds
About 15 holes later the piece popped out.
The piece was long enough to tuck between the seat and seat rails with that sandwhiching effect it held in place but I used a flat 3/16" aluminum that is pre drilled with holes and used that to tie the middle back part of the seat so it wouldn't pull apart and the bracket fall out.
Now I know I Mickey moused it on the bracket install and I could of had drilled a couple holes and bolt it down but I didn't wanna make a mess with metal shavings and get it over the new seats , I could put a plastic bag or something but it was getting dark(started around 5pm) and I was getting impatient to install the seats. Plus the homie has a welder at the shop with a couple good spot welds shit won't budge anymore.
Install was a little of a pain, the bracket slipped out when I was putting it in so I got the tracks lined up w the studs bolt it down the loosened the seat rail to seat frame bolt enough to slip the bracket back in and voila!!
Fresh black w blue piping 50/50 split seats.
I'd post pics but having trouble figuring out how.
Sweet Seventy9- *Senior Moderator*
- Helpful and Responsive Member!Very active with responding and helping other members with questions and concerns.10th Year Anniversary10 years of being a member on our forum!
- Posts : 973
Join date : 2013-11-03
Location : Upstate NY
- Post n°18
Re: 6-Way Power Seat Disassembly
HeavyChevy77 wrote:
Yea but then it would be a fixed position and if ima have electric seats they might as well function ima just join them in the center but might make a slide rail and bolt it in the middle , so thanks for that little idea
Actually, no. You bolt the seat down in the same manner as if the studs were already on the floor. Only you're using bolts and spacers instead of studs. That's probably the easiest, least expensive way to do it. I'm glad you were able come up with a different way that works for you.
383Falcon- Active Member (Tier 2)
- 10th Year Anniversary10 years of being a member on our forum!
- Posts : 45
Join date : 2014-06-25
Location : Belliongham, Wa
- Post n°19
Re: 6-Way Power Seat Disassembly
GM B-Body Forum wrote:Oh yes it is very possible. The only problem i see is where the brackets bolt to the seat, im sure they may be in different locations on different seats depending on what you put it. But its definitely possible.
What sort of gages are you running in your impala?
GM B-Body Forum- Admin
- Helpful and Responsive Member!Very active with responding and helping other members with questions and concerns.10th Year Anniversary10 years of being a member on our forum!
- Posts : 756
Join date : 2013-01-14
Age : 32
Location : Flint/Detroit, MI - Charlotte, NC
- Post n°20
Re: 6-Way Power Seat Disassembly
Right now ive got that cheap little sunpro tach installed, but im going to do a custom dash and use Autometer Cobalt gauges, but those gauges aint cheap!
Myloth- Moderator
- Helpful and Responsive Member!Very active with responding and helping other members with questions and concerns.10th Year Anniversary10 years of being a member on our forum!
- Posts : 638
Join date : 2014-06-09
Location : At the base of the Mountain (NY) Adirondacks
- Post n°21
Re: 6-Way Power Seat Disassembly
I just received one of these
http://www.summitracing.com/parts/EQU-7072
I plan to install itwhen I get a new cable(Manufacturer ship=slow) with other black face gauges.
In a custom 5 gauge aluminum cluster
I can post some observations and hopefully good things about it soon.
http://www.summitracing.com/parts/EQU-7072
I plan to install itwhen I get a new cable(Manufacturer ship=slow) with other black face gauges.
In a custom 5 gauge aluminum cluster
I can post some observations and hopefully good things about it soon.
383Falcon- Active Member (Tier 2)
- 10th Year Anniversary10 years of being a member on our forum!
- Posts : 45
Join date : 2014-06-25
Location : Belliongham, Wa
- Post n°22
Re: 6-Way Power Seat Disassembly
GM B-Body Forum wrote:Right now ive got that cheap little sunpro tach installed, but im going to do a custom dash and use Autometer Cobalt gauges, but those gauges aint cheap!
Tell me about it! I'm rocking sunpro too lol Your gage cluster looks like it's out of a roadmaster or something, I don't think I have seen one like it before :]