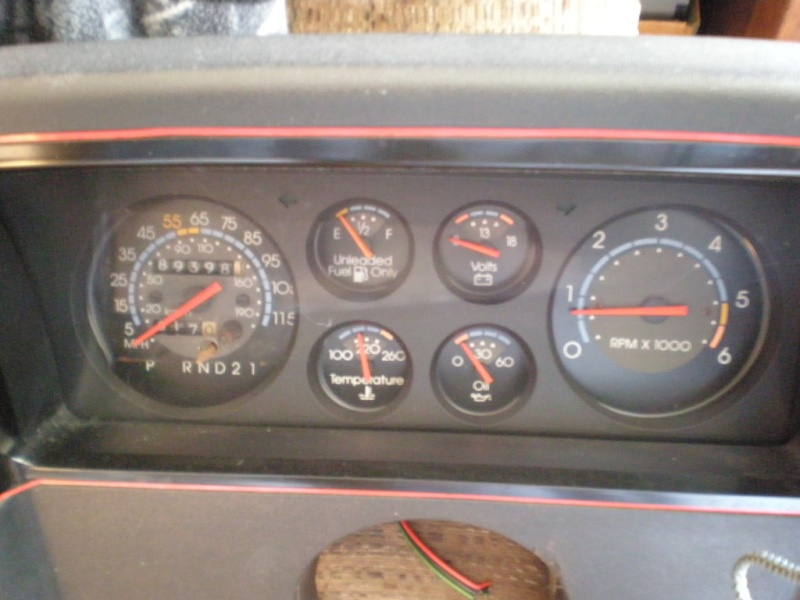
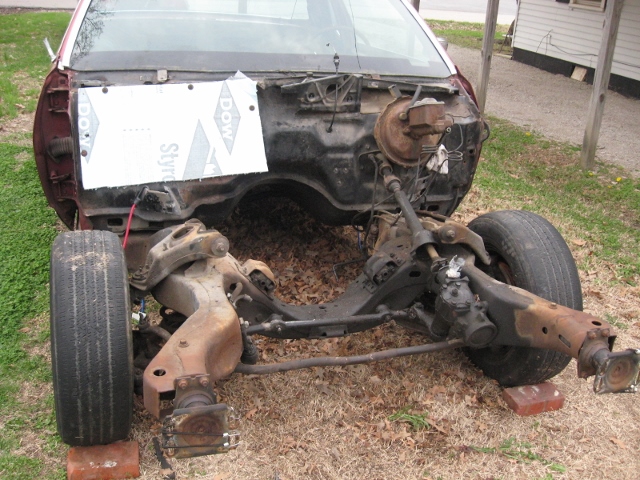
+9
bgkid2966
razzbury_shark
Myloth
jacob79caprice2dr
79treemaster
Sweet Seventy9
kartmaster
GM B-Body Forum
solo79
13 posters
'79 Chevy Caprice 2-door then and now...

GM B-Body Forum- Admin

- Helpful and Responsive Member!Very active with responding and helping other members with questions and concerns.10th Year Anniversary10 years of being a member on our forum!
- Posts : 756
Join date : 2013-01-14
Age : 32
Location : Flint/Detroit, MI - Charlotte, NC
Oh yeah ive seen that Dakota Digital inst cluster, way too expensive. I thought about doing that a few years ago, but then i striked that plan off. They also make led tail lights for the 79's also way too expensive. And yeah for the idiot light to come on it is too late, i believe the temp switch is set to come on at 260 degrees, which by then the motors already cooking, this happened to me with the original motor, i spun a rod bearing from overheating (get this) on my way to my first car show with the car.

Sweet Seventy9- *Senior Moderator*

- Helpful and Responsive Member!Very active with responding and helping other members with questions and concerns.10th Year Anniversary10 years of being a member on our forum!
- Posts : 973
Join date : 2013-11-03
Location : Upstate NY
I'm with you guys on the Dakota Digital gauges, nice looking but too expensive.
It's pretty much the only thing there is for us to use if we install a 4L60E or 80E if we want a working speedometer.
This was my dream dash set-up.
All hand fabbed.... effing beautiful!

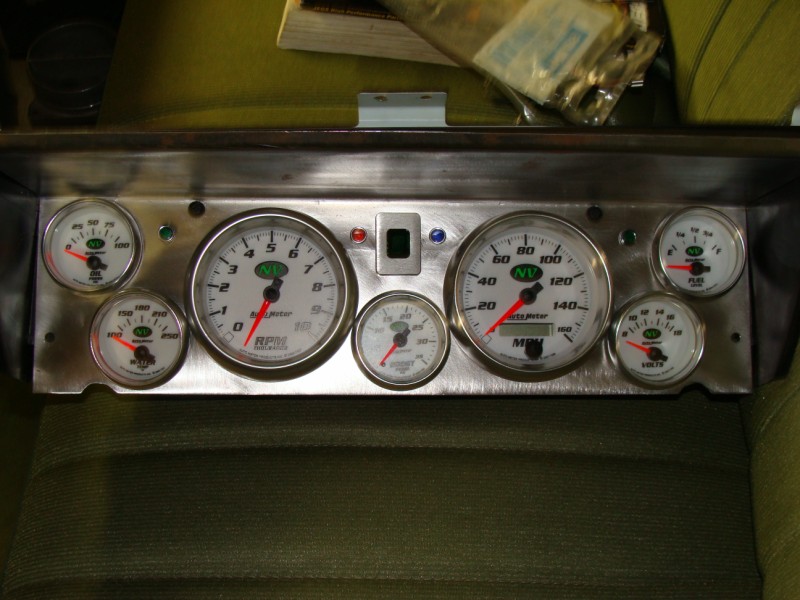 " />
" />
It's too bad that we're stuck with this ↓ for factory gauges.
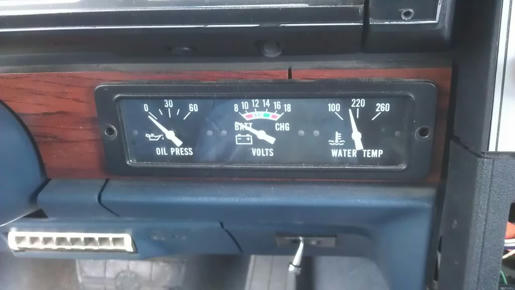
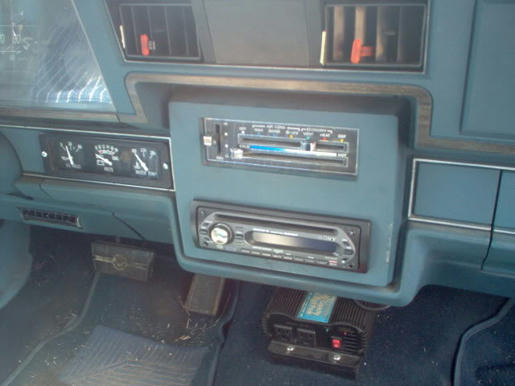
I can get my hands on a couple of these if anybody is interested.
It's pretty much the only thing there is for us to use if we install a 4L60E or 80E if we want a working speedometer.
This was my dream dash set-up.
All hand fabbed.... effing beautiful!
 " />
" />It's too bad that we're stuck with this ↓ for factory gauges.


I can get my hands on a couple of these if anybody is interested.

solo79- *Senior Moderator*

- 10th Year Anniversary10 years of being a member on our forum!
- Posts : 458
Join date : 2013-02-06
Location : Kentucky
I love the hand fabricated gauge panel, that is awesome. Thought about doing something like that too. I hate to say it, but I kind of dig the old school looking add on gauge panel, except I'd have to center it more in that dash area or put it somewhere else. Was that factory on some cars? I've never seen that before. Still need a tach though.
There's another crazy idea I thought about doing and that's putting a FULL Trans Am dash in it. For kicks, I measured the shell width on both the Trans Am dash and the Caprice dash a few weeks back and suffice to say, there's just under a half inch difference in length, so about 1/4" each side. I think it would look killer in there, but A LOT of fab to get it in there. This is the dash in my 89 Firebird and since it is square with sharp edges, I think it would fit the Caprice well and give me all the gauges I could ask for, but I'm still pondering that one.

Thoughts?
There's another crazy idea I thought about doing and that's putting a FULL Trans Am dash in it. For kicks, I measured the shell width on both the Trans Am dash and the Caprice dash a few weeks back and suffice to say, there's just under a half inch difference in length, so about 1/4" each side. I think it would look killer in there, but A LOT of fab to get it in there. This is the dash in my 89 Firebird and since it is square with sharp edges, I think it would fit the Caprice well and give me all the gauges I could ask for, but I'm still pondering that one.
Thoughts?

solo79- *Senior Moderator*

- 10th Year Anniversary10 years of being a member on our forum!
- Posts : 458
Join date : 2013-02-06
Location : Kentucky
Made a little progress today. Just basically started disconnecting/removing all dash wiring and labeling it all (both sides of harnesses). Question of the day: does anyone know if the main harness that goes into the firewall next to the brake booster will unplug right there? It looks like it might, but I couldn't figure it out yet.
Started to remove the air box and it took me like an hour just to get the cowl screen off. Somebody put roofing tar all under that thing and it was dripping down into the box like a waterfall of tar and I had it all over me. I cannot for the life of me understand why someone would do that. All of the screws were in it and they too were covered with roofing tar. I had to dig the screws out, remove the screws, then pry like crazy to get the thing off. Tell me this is not factory. I do not remember my first car having the cowl screen glued down with roofing tar when I pulled the air box on it.
Unfortunately, I broke the heck out of the screen flange in several places, so another part to find!!

Sweet Seventy9- *Senior Moderator*

- Helpful and Responsive Member!Very active with responding and helping other members with questions and concerns.10th Year Anniversary10 years of being a member on our forum!
- Posts : 973
Join date : 2013-11-03
Location : Upstate NY
solo79 wrote:Made a little progress today. Just basically started disconnecting/removing all dash wiring and labeling it all (both sides of harnesses). Question of the day: does anyone know if the main harness that goes into the firewall next to the brake booster will unplug right there? It looks like it might, but I couldn't figure it out yet.
Started to remove the air box and it took me like an hour just to get the cowl screen off. Somebody put roofing tar all under that thing and it was dripping down into the box like a waterfall of tar and I had it all over me. I cannot for the life of me understand why someone would do that. All of the screws were in it and they too were covered with roofing tar. I had to dig the screws out, remove the screws, then pry like crazy to get the thing off. Tell me this is not factory. I do not remember my first car having the cowl screen glued down with roofing tar when I pulled the air box on it.
Unfortunately, I broke the heck out of the screen flange in several places, so another part to find!!
The factory used a sealer all around the housing, but it's usually hard as a rock by now. If it was soft and sticky, I bet a a previous owner had a leak and was attempting to seal it up with the tar-like stuff. Sad thing is, it was most likely the windshield leaking which is fairly common especially if it's been replaced.
I think I still have a spare screen out in one of my sheds you can have, but I'm no longer 100% positive. (recently I've given a TON of parts away.) When we get some warmer weather I'll go take a look and let you know.
You'll have to remind me though, because if i don't do something right away, I WILL forget.
In case you look local to you, they're all the same from 77-90.

Sweet Seventy9- *Senior Moderator*

- Helpful and Responsive Member!Very active with responding and helping other members with questions and concerns.10th Year Anniversary10 years of being a member on our forum!
- Posts : 973
Join date : 2013-11-03
Location : Upstate NY
solo79 wrote:I love the hand fabricated gauge panel, that is awesome. Thought about doing something like that too. I hate to say it, but I kind of dig the old school looking add on gauge panel, except I'd have to center it more in that dash area or put it somewhere else. Was that factory on some cars? I've never seen that before. Still need a tach though.
There's another crazy idea I thought about doing and that's putting a FULL Trans Am dash in it. For kicks, I measured the shell width on both the Trans Am dash and the Caprice dash a few weeks back and suffice to say, there's just under a half inch difference in length, so about 1/4" each side. I think it would look killer in there, but A LOT of fab to get it in there. This is the dash in my 89 Firebird and since it is square with sharp edges, I think it would fit the Caprice well and give me all the gauges I could ask for, but I'm still pondering that one.
Thoughts?
Sorry, I missed this post.
As far as I know, those gauges were only available on boxy 9C1s.
Sounds like a LOT of work to install the TA dash. It would be different and one-of-a-kind though.
Have you considered a Monte Carlo SS dash pod? Although I've never done it myself, I'm told they're a pretty simple install.

solo79- *Senior Moderator*

- 10th Year Anniversary10 years of being a member on our forum!
- Posts : 458
Join date : 2013-02-06
Location : Kentucky
Updates. Finally got the entire air box out on Saturday and all the wiring/vacuum hoses with it. Took a bit to get it out without breaking it. It's been removed before and was basically glued in place with some kind of white adhesive. The flange around the opening of the firewall is a little rusty, but not too bad. I didn't get a chance to take a pic before it got dark, so I'll take one next time. I still want an a/c delete box sweet seventy9 as I think it will work. I was concerned the firewalls might be different, but it's all one big rectangular opening, so I'd say they are the same. Anyway, if you come across another one, let me know!!
A little off topic, but KITT was getting jealous of all the work on the Caprice, so I got him out of winter hibernation today to change the oil and fix the oil filter mount leak. He got some attention, so he's happy again.haha


A little off topic, but KITT was getting jealous of all the work on the Caprice, so I got him out of winter hibernation today to change the oil and fix the oil filter mount leak. He got some attention, so he's happy again.haha


GM B-Body Forum- Admin

- Helpful and Responsive Member!Very active with responding and helping other members with questions and concerns.10th Year Anniversary10 years of being a member on our forum!
- Posts : 756
Join date : 2013-01-14
Age : 32
Location : Flint/Detroit, MI - Charlotte, NC
Wow Kitt looks really good, clean! How do you like driving around with that steering wheel? lol

Sweet Seventy9- *Senior Moderator*

- Helpful and Responsive Member!Very active with responding and helping other members with questions and concerns.10th Year Anniversary10 years of being a member on our forum!
- Posts : 973
Join date : 2013-11-03
Location : Upstate NY
DUDE! Kitt looks fantastic! 
I recently re-gained entry to a long closed salvage yard and believe it or not, theres another non-AC Impala there!
I recently re-gained entry to a long closed salvage yard and believe it or not, theres another non-AC Impala there!

solo79- *Senior Moderator*

- 10th Year Anniversary10 years of being a member on our forum!
- Posts : 458
Join date : 2013-02-06
Location : Kentucky
GM B-Body Forum wrote:Wow Kitt looks really good, clean! How do you like driving around with that steering wheel? lol
Hey thanks!! Well, I can tell you it's quite a challenge when you first drive with one, but after awhile you get used to it. I prefer it over a round wheel actually.lol I've had a wheel like that since 2002 and this is actually my second KITT car. I built an 84 Trans Am KITT from '02-04' and sold it in '05. That car had serious rust issues and an engine on it's last leg and I still got $8,500 for it.lol Then, in '06 I bought a rust free solid 82 and started over again. I've been working on it and have had this KITT 8 years now and decided to keep it. I haven't done anything major to it in about 2 years, but it's pretty closed to finished except it needs a new paint job and a few buttons/switches and dash electronics. It shows great for now though at the local cruise-ins and car shows.
Lately though, the Caprice is getting all the attention.

solo79- *Senior Moderator*

- 10th Year Anniversary10 years of being a member on our forum!
- Posts : 458
Join date : 2013-02-06
Location : Kentucky
Sweet Seventy9 wrote:DUDE! Kitt looks fantastic!
I recently re-gained entry to a long closed salvage yard and believe it or not, theres another non-AC Impala there!
Thanks!! Cool about the non-ac Impala. It's amazing how there's so many up there and I've never even seen one around here. No rush, but if you decide to kill time one day when it's warm and go get it out, let me know. I will definitely buy it from you. I'd need the box and heater core mount (in case it's different) and anything else you think I might need as well to go with it. Don't worry if it cracks or anything, even mine was cracked on the bottom when I pulled it out. It's easy to fix since it's fiberglass. Even if it has a small hole in it or something, don't worry, I can fix it.

Sweet Seventy9- *Senior Moderator*

- Helpful and Responsive Member!Very active with responding and helping other members with questions and concerns.10th Year Anniversary10 years of being a member on our forum!
- Posts : 973
Join date : 2013-11-03
Location : Upstate NY
Back then AC was a relatively expensive option. All 3 I've seen were Base models with no options at all. I bet the dealer(s) ordered them that way for the lower budget new car buyer.
NP, I can grab the parts for you. Definitely have to wait for warmer weather though. If a couple months go by and you haven't heard back from me about it yet, please remind me. Sometimes I get so busy I forget things.
NP, I can grab the parts for you. Definitely have to wait for warmer weather though. If a couple months go by and you haven't heard back from me about it yet, please remind me. Sometimes I get so busy I forget things.

solo79- *Senior Moderator*

- 10th Year Anniversary10 years of being a member on our forum!
- Posts : 458
Join date : 2013-02-06
Location : Kentucky
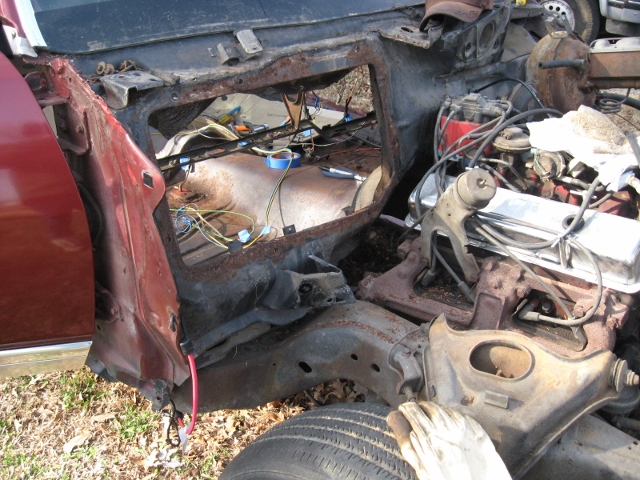
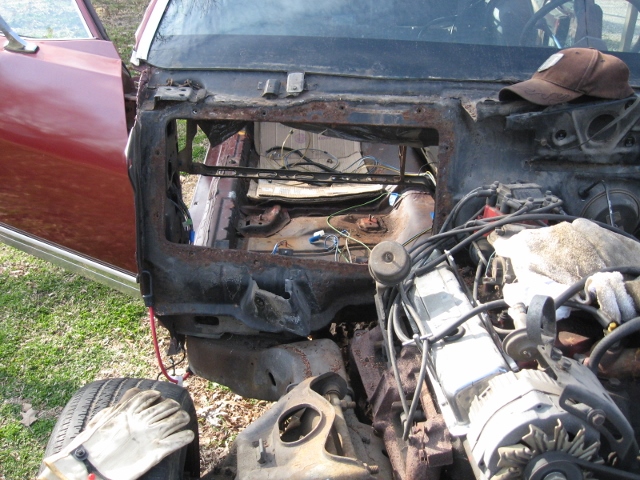
Progress this weekend:
First, here are the pics of the air box removed:
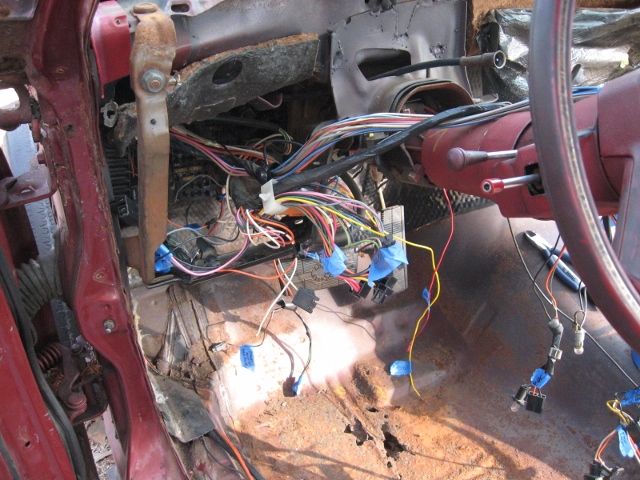
Finally got all of the wiring labeled and ready to pull it all out:
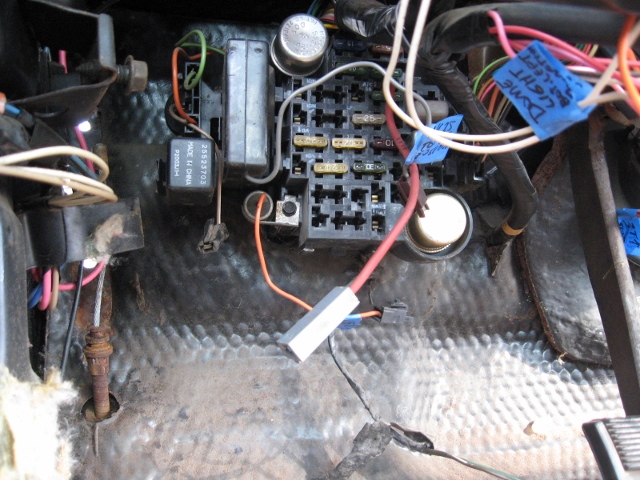
Emergency brake assembly removed:
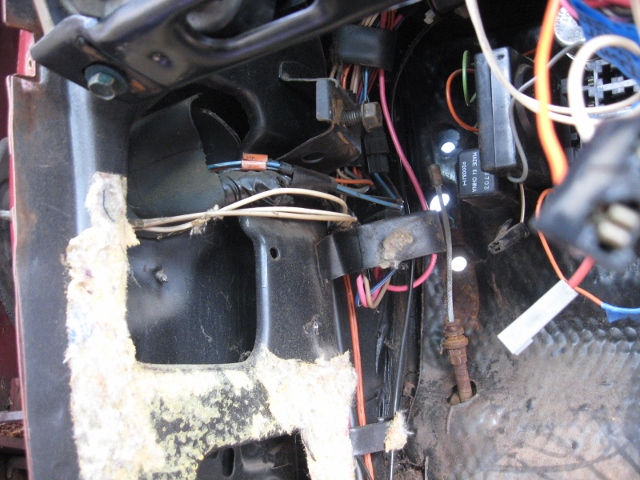
All wiring and fuse box removed:


And.....here it all is:
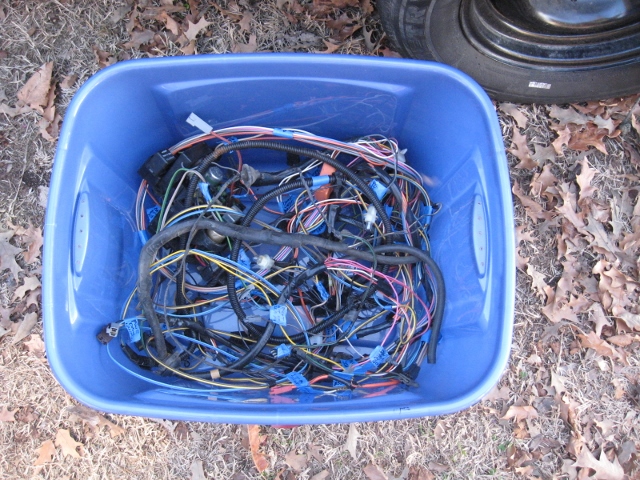
Lots of wire and looks like a mess, but I know where it all goes and that's all that matters. I'll be going through it all at some point checking and cleaning the wires and fixing a few pinched ones I found.
Finally, bulkhead and engine harness completely removed:
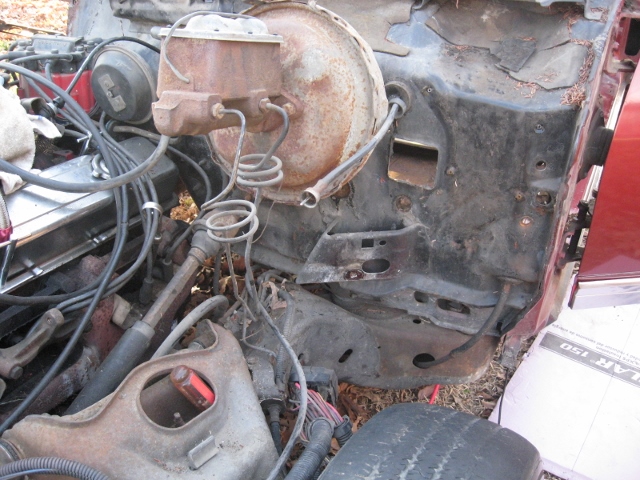
The only wiring left to remove is the power window and locks harnesses inside the doors. I probably won't remove that until I get ready to take the doors off which will be awhile anyway.
I'm now ready to remove the brake assembly, brake booster, master cylinder, accelerator cable and pedal assembly and of course the engine is ready to come out any time now. Full speed ahead.
I can't wait to actually start reconditioning, repairing and repainting things.
First, here are the pics of the air box removed:


Finally got all of the wiring labeled and ready to pull it all out:


Emergency brake assembly removed:

All wiring and fuse box removed:


And.....here it all is:

Lots of wire and looks like a mess, but I know where it all goes and that's all that matters. I'll be going through it all at some point checking and cleaning the wires and fixing a few pinched ones I found.
Finally, bulkhead and engine harness completely removed:

The only wiring left to remove is the power window and locks harnesses inside the doors. I probably won't remove that until I get ready to take the doors off which will be awhile anyway.
I'm now ready to remove the brake assembly, brake booster, master cylinder, accelerator cable and pedal assembly and of course the engine is ready to come out any time now. Full speed ahead.
I can't wait to actually start reconditioning, repairing and repainting things.

GM B-Body Forum- Admin

- Helpful and Responsive Member!Very active with responding and helping other members with questions and concerns.10th Year Anniversary10 years of being a member on our forum!
- Posts : 756
Join date : 2013-01-14
Age : 32
Location : Flint/Detroit, MI - Charlotte, NC
Progress is lookin good, in fact that should be her name, for the time being "Progress" lol. I couldnt remember if you said, but are you going to keep the original motor in there and rebuild it or drop in like a crate motor?

solo79- *Senior Moderator*

- 10th Year Anniversary10 years of being a member on our forum!
- Posts : 458
Join date : 2013-02-06
Location : Kentucky
GM B-Body Forum wrote:Progress is lookin good, in fact that should be her name, for the time being "Progress" lol. I couldnt remember if you said, but are you going to keep the original motor in there and rebuild it or drop in like a crate motor?
I'm going to rebuild that engine since I found out it is a 350. When I first bought it, it would start and idle fine, no misfire and even rev up good, just had a loud low end knocking sound. I suspect it's a broken rod. I'm pretty confident with the way it would still run that there isn't anything wrong with the block and heads. It didn't even smoke or anything. If it would have been a 305, I would have tossed it and probably went with a crate 350 or built my own. I think this one is a good solid foundation for a good mild 350 build. I'll know for sure when I get it out and on the stand and tear it down. I'll document that as I go as well.

solo79- *Senior Moderator*

- 10th Year Anniversary10 years of being a member on our forum!
- Posts : 458
Join date : 2013-02-06
Location : Kentucky
No progress on my car. As luck would have it, I'm helping a friend destroy a nice '93 Fleetwood...errr I mean put hydraulics on it. This whole weekend has been a disaster including setting fuel lines on fire, almost dying and blowing up a garage and car etc. It's just not worth it. After doing this again this many years later, it made me realize just how much damage and cutting has to be done to install this stuff. I am now 100% certain that MY CAPRICE will NOT be getting hydraulics.
After I spend all this time and money doing a body off restoration and making this car look beautiful, I AM NOT CUTTING IT UP!!!!!!!!!!!!!!!!!
I'm going with air ride. Rides better and looks better. They make nice bolt on kits now that require zero cutting and zero welding. I'm going with an engine driven compressor and silencers because I don't want to hear the air sound when going down either and I hate the sound of the compressors running in the trunk.

GM B-Body Forum- Admin

- Helpful and Responsive Member!Very active with responding and helping other members with questions and concerns.10th Year Anniversary10 years of being a member on our forum!
- Posts : 756
Join date : 2013-01-14
Age : 32
Location : Flint/Detroit, MI - Charlotte, NC
I definitely agree with you on that one, i wouldnt want to mess up all the time and money i just put into it. Air ride is perfect, alot of b body owners put an air ride system on their car.

Sweet Seventy9- *Senior Moderator*

- Helpful and Responsive Member!Very active with responding and helping other members with questions and concerns.10th Year Anniversary10 years of being a member on our forum!
- Posts : 973
Join date : 2013-11-03
Location : Upstate NY
I can appreciate most things people do to their cars, but I just don't get hydraulics.

solo79- *Senior Moderator*

- 10th Year Anniversary10 years of being a member on our forum!
- Posts : 458
Join date : 2013-02-06
Location : Kentucky
Sweet Seventy9 wrote:I can appreciate most things people do to their cars, but I just don't get hydraulics.
It appealed to me at one time. Honestly, if I could have gotten my old car back, I would have left it as is and restored it. I still like the idea of having adjustable suspension and air ride is so much easier on the car. Since I'm completely restoring this car, it just makes sense to put air ride on it because I'm not that young kid anymore who's going to go out to the strip and play with the car every weeknight and weekend like I did back then. I might cruise it a little, but it's going to be a show car that I can drive at factory height without bouncing to a show, but be able to sit it down on the ground at shows and cruise-ins. The nice thing is, if I get tired of it, I can go back to stock suspension or lowering springs very easily with no effort. Whereas once you "juice" a car, it's juiced forever. The fast motion and twisting is really hard on it. All of the cutting and welding can be undone by putting a new frame under it, axle, and welding up the trunk floor holes etc..., but why cut a nice car after you've spent 1,000s of dollars on it?
People were telling me I should just not even worry about restoring the car and just juice it and give it a paint job and do the interior, rebuild the engine and go. Well, that's what I did on my first one. Not this one.

solo79- *Senior Moderator*

- 10th Year Anniversary10 years of being a member on our forum!
- Posts : 458
Join date : 2013-02-06
Location : Kentucky

solo79- *Senior Moderator*

- 10th Year Anniversary10 years of being a member on our forum!
- Posts : 458
Join date : 2013-02-06
Location : Kentucky
You'll notice that at some point, someone cut the factory battery cable and conveniently left some of it on the frame. It came out pretty easily except I had to cut the exhaust off. The bolts and nuts are rusty blobs that wouldn't budge even after soaking in penetrating oil for weeks. The only real trouble I had was the brand new engine stand. While rolling it not even 2 feet, the front wheel bearings fell out and it almost tipped over on me. I had to rob the front wheel off my other stand and put that one on blocks for now until I can take this wheel and the receipt back and get another wheel. You just can't get good quality stuff anymore. The engine is safe inside the building and ready for tear down.
I bet you're wondering how I got that engine out of there in grass? Easy. I built a 3/4" plywood road from the building to the car for the hoist and stand. Who needs concrete and a garage?lol Worked flawlessly, well except for the cheap caster wheel.
I bet you're wondering how I got that engine out of there in grass? Easy. I built a 3/4" plywood road from the building to the car for the hoist and stand. Who needs concrete and a garage?lol Worked flawlessly, well except for the cheap caster wheel.

GM B-Body Forum- Admin

- Helpful and Responsive Member!Very active with responding and helping other members with questions and concerns.10th Year Anniversary10 years of being a member on our forum!
- Posts : 756
Join date : 2013-01-14
Age : 32
Location : Flint/Detroit, MI - Charlotte, NC
Haha cool. The front end looks surprisingly clean, and rust free considering what rest of the body looks like. I cant wait to do my frame off resto, but it wont be happening anytime soon. I feel like i asked this question before, but i cant remember, so here it is. You said your doing a frame off, are you planning on doing it there at home? If so how are you planning on removing the body? Ive been thinking and planning about that for months, about the "safest" easiest way possible. I see alot of floor jacks, jack stands and 2x4's in my future lol.

solo79- *Senior Moderator*

- 10th Year Anniversary10 years of being a member on our forum!
- Posts : 458
Join date : 2013-02-06
Location : Kentucky
GM B-Body Forum wrote:Haha cool. The front end looks surprisingly clean, and rust free considering what rest of the body looks like. I cant wait to do my frame off resto, but it wont be happening anytime soon. I feel like i asked this question before, but i cant remember, so here it is. You said your doing a frame off, are you planning on doing it there at home? If so how are you planning on removing the body? Ive been thinking and planning about that for months, about the "safest" easiest way possible. I see alot of floor jacks, jack stands and 2x4's in my future lol.
I too have been trying to come up with ideas over the past year and I think I've settled on building two timber A-Frames out of 6x6 timber and lag bolts. I used to work for a construction company and we built a lot of timber frame houses and structures, so I've got the knowledge. It might be a bit overkill, but it will support a car body. They'll be tied together with cross bracing and it will have large 4" thick lag bolted wood plates to bolt the car body to on each end on some kind of rotating assembly. I'm still drawing the design in CAD and working on it. This is the only safe way I can see to do it on grass. The A-Frames will be secured to the ground with tornado anchors. I've seen people on the internet do a complete frame-off outdoors and while challenging, very possible.
I'm going to repair the floor pans and package tray while it's still on the frame so the body doesn't "flex" when cutting out floors. I think it's best to leave it bolted in place while repairing the pans. The goal is to be able to clean and coat every inch of the underbody, so while I don't really need to flip it over, I need to get it high enough to get under it safely. It would make it easier to be able to rotate it so I'm not upside down all the time, but we'll see after I get the pans fixed.

solo79- *Senior Moderator*

- 10th Year Anniversary10 years of being a member on our forum!
- Posts : 458
Join date : 2013-02-06
Location : Kentucky
Well not much to report on updates since I've been working on everyone else's cars. It's show season for KITT, so I've been giving him attention and he needed some work on the fuel system after the long winter. I did manage to completely rearrange my building so I could have more room to tear down the 350 for the Caprice today. I'm hoping this week after work I can start removing the brake booster, pedals, exhaust and gas tank and fuel lines. This car does not have a fuel return, so I'll be adding one of those when I put it back together.

solo79- *Senior Moderator*

- 10th Year Anniversary10 years of being a member on our forum!
- Posts : 458
Join date : 2013-02-06
Location : Kentucky
- Post n°100
 Re: '79 Chevy Caprice 2-door then and now...
Updates: I got the engine tore all the way down to bare block. Not too bad and pretty clean inside. Found #7 & #8 with spun rod bearings. Mains were good, but I think the crank is toast. It's already been turned .10 and has pretty good damage from #7 & #8. The engine was clearly starved of oil since the oil pump catch screen was completely packed with carbon and other gunk. All rods appeared to have been hot. #7 & #8 will need reconditioning for sure. The bearings in those were completely destroyed and wrapped around each other. I'll have to take all rods to get them checked. Looks like I might be able to get by with a simple hone and new rings without boring, but won't know until I check the gap with the ring and put a micrometer on the cylinders. However, they're clean and look ok.
Now for some pics:
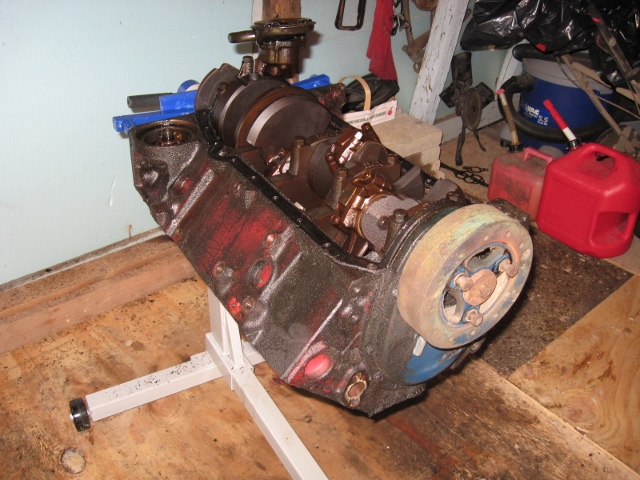
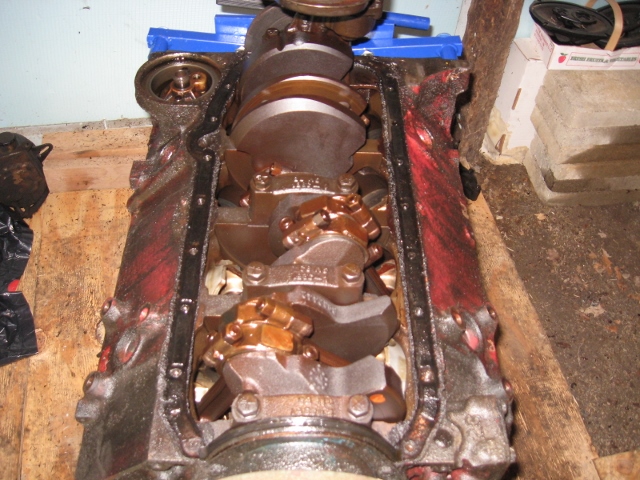

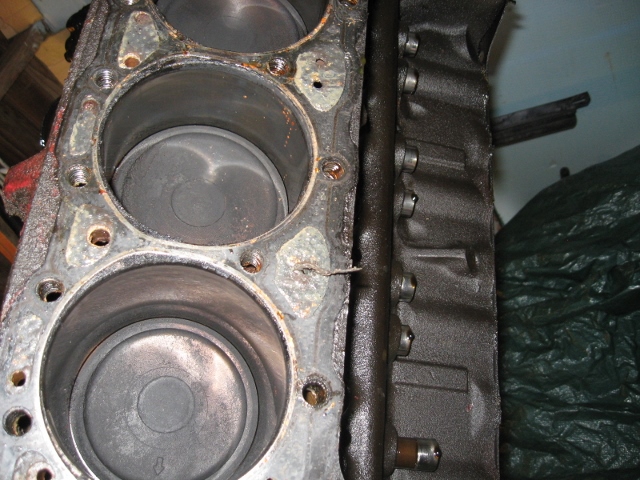
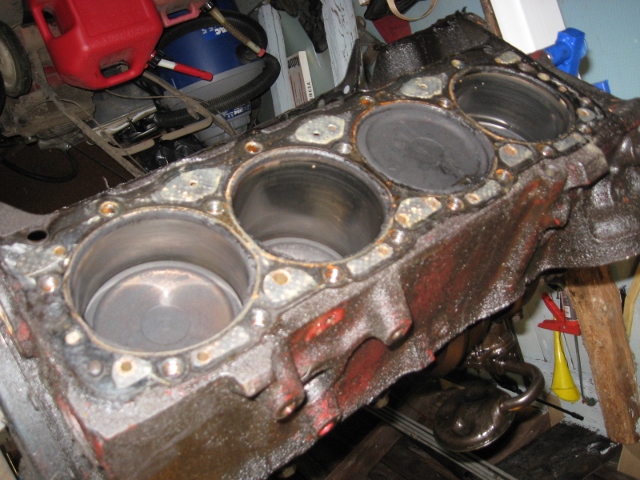
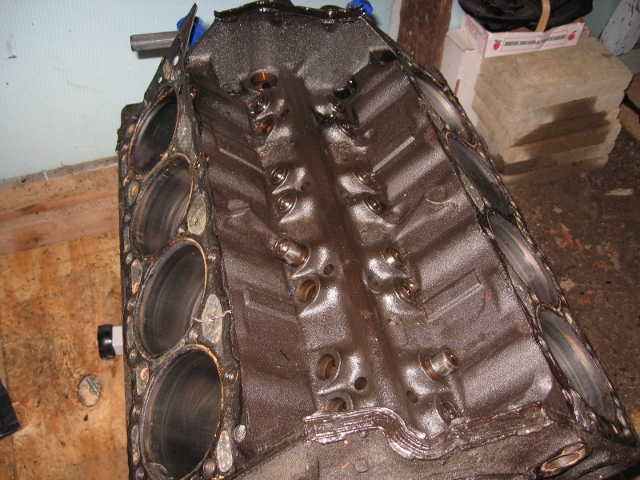
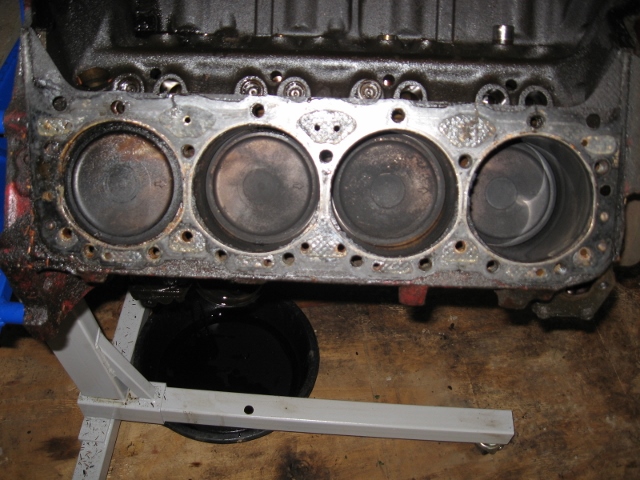
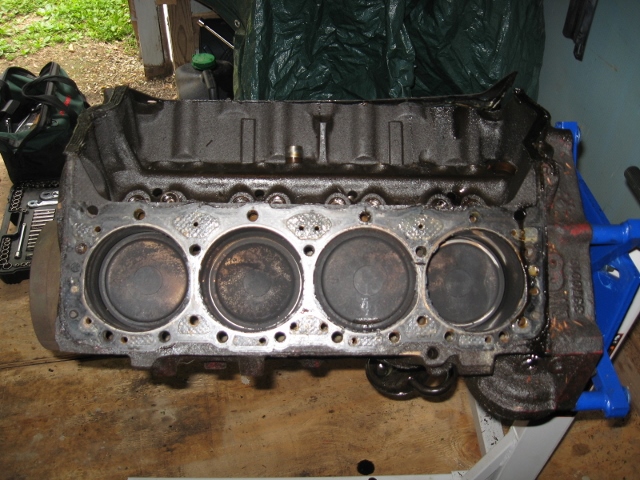
Anyone know what kind of pistons those are? I've never seen pistons like this. Super low compression??
Now for some pics:


Anyone know what kind of pistons those are? I've never seen pistons like this. Super low compression??


